There's a fix for that!
ZoomWhether caused by a virus, a new operating system or by simple mistake, being faced with an "Operating System not found" or similar error during your computer system's boot up can be a nerve rattling experience. Assuming you have Microsoft's Window 7 installed however, do not fear, such a boot error can often be resolved in just a few simple steps.
First, check your BIOS and hardware
In many cases, having Windows 7 fail to boot may be as simple as having your BIOS set with an incorrect boot order sequence. It can be quite common if you have more than one hard drive installed in your computer and your BIOS gets reset. Usually you can access your BIOS seconds after your computer turns on by pressing the Delete button or by pressing a specific function key. Once in the BIOS, check to see that your system drive is listed appropriately in the boot order sequence; you may need to refer to your motherboard manual for help.
Another possible reason for Windows not being detected upon start up is a hardware issue. If your BIOS is unable to detect your system drive, check to make sure all the cables are plugged in properly. If your hard drive is making an odd noise, such as a clicking sound, your hard drive may be broken. Finally, it is possible that the hard drive is having data corruption issues, which has damaged important system data, such as the Master Boot Record (MBR). If you suspect a faulty hard drive, it may be a good idea to backup and scan your hard drive for errors from another computer and possibly consider buying a replacement. Trying to repair a boot problem on a damaged drive can possibly lead to even more data loss, so backup your data before attempting anything.
The MBR and other important boot data can also be damaged by trying to install an earlier version of Windows, such as Windows XP, alongside Windows 7 and by third-party programs, such as viruses. In the case of a virus, it is recommended that you run a virus scan of the drive before attempting any repairs as otherwise it could lead to more data loss. It is further possible to achieve the appearance of damaged boot data by having the wrong drive partition set to active, which can be the outcome of an overly curious Windows user with administrative permissions.
Fixing the MBR and other start up problems in Windows 7 is most quickly accomplished by using the Windows 7 Installation DVD. If you do not have a Windows 7 Installation DVD however, you can alternatively use a Windows 7 System Recovery Disc, which we will show you how to create further down in this article. If you do not yet have either a Windows 7 Installation DVD or a recovery disc, do yourself a big favor and make a recovery disc right away to avoid any unnecessary headaches down the road.
Fixing the Master Boot Record (MBR)
Step one: Turn your computer on, booting from either your Windows 7 Installation DVD or Windows 7 System Recovery Disc. Remember, you may need to change the boot order inside your BIOS to have the your DVD drive boot first.
Step two: After the installation or recovery disc loads, if prompted, select your language settings and then continue. If you are using the installation DVD, when prompted by the following screen select Repair your computer.
ZoomStep three: The computer will take a moment now to scan itself for any Windows installations, after which you will likely be given a choice to select which installation you wish to repair. Select the appropriate Windows installation from the list and then continue. If by chance a problem is detected in one of your Windows installations at this initial stage, the system may also ask you if it can try to repair the problem automatically. It is up to you if you wish to let the system try to repair itself, but otherwise just select No.
Step four: Once you have reached the System Recovery Options screen, as shown below, you will be faced with a list of choices that can aid you in repairing a damaged Windows 7 operating system. If you wish to try the Startup Repair option first, it is often successful in automatically fixing many different start up issues, but in this article we will be using the Command Prompt option to resolve our problems manually. So, click Command Prompt to continue.
ZoomStep five: Now sitting at the command prompt, enter the following command and then press enter:
bootrec.exe /FixMbr
If successful, you should be greeted with the message The operation completed successfully. That's it! Your Master Boot Record has been repaired.
While the above command does fix the MBR, and sometimes that is enough, there still might be an error with the system partition's boot sector and Boot Configuration Data (BCD). This might occur if you have tried to install another operating system alongside Windows 7, such as Windows XP. To write a new boot sector, try the following command:
bootrec.exe /FixBoot
If you are still faced with your Windows 7 installation not being detected during start up, or if you wish to include more than one operating system choice to your system's boot list, you can try the following command to rebuild your BCD:
bootrec.exe /RebuildBcd
The above command will scan all your disks for other operating systems compatible with Windows 7 and allow you to add them to your system's boot list. If this fails, you may need to backup the old BCD folder* and create a new one in its place with the following commands:
bcdedit /export C:\BCD_Backup
c:
cd boot
attrib bcd -s -h -r
ren c:\boot\bcd bcd.old
bootrec /RebuildBcd
*Some users also find simply deleting the boot folder and retrying the above steps effective at resolving boot issues, but it is not recommended.
How to change active partitions
Upon purposely changing the active partition on my system drive, I was faced with a BOOTMGR is missing error during my system's start up that prevent Windows from starting. It is a common mistake to make when playing with partitions on a system drive and it can be a headache to solve if not prepared. To change your active partition back using the Windows 7 recovery disc or Installation DVD, follow the steps below.
Step one: Follow steps one to four in the above guide. This should take you to the Command Prompt in the Windows Recovery Environment.
Step two: Type DiskPart and then press Enter.
Step three: Type List Disk now and then press Enter. This command will list all disks attached to your computer and assign them a disk number.
Step four: Type Select Disk x, where x is the number for the disk containing the partition you wish to make active. Press Enter.
Step five: Type List Partition and then press Enter. You will now be shown a list of the partitions on the selected disk. Determine which partition you wish to make active.
Step six: Type Select Partition x, where x is the number of the partition you wish to make active.
Step seven: Now, just type Active and then press Enter. That should be it - the selected partition is now active.
ZoomHow to create a Windows 7 System Recovery Disc
Windows 7 makes it easy to create a System Recovery Disc if you already have Windows 7 installed and running.
Step one: Click Start > All Programs > Maintenance > Create a System Repair Disc
Step two: Insert a blank CD or DVD into your disc drive.
Step three: Click Create disc and let the program do its thing.
ZoomThat's it! It only needs to write about 140- to 160-megabytes to the disc, depending on whether your OS is 64-bit or 32-bit, and that should only take a minute. If you do not have a CD/DVD-R drive to create a recovery disc with, you can alternatively download the ISO image of the Windows 7 System Recovery Disc and use it to make a bootable USB flash drive.
How to create a Windows 7 System Recovery USB flash drive
Step one: If you do not have a DVD drive, download the appropriate Windows 7 Recovery Disc image from Here. You will need a torrent client for this step, such as µTorrent. Alternatively, if you have a DVD drive, you can use an existing Windows 7 Installation DVD or a Windows 7 Recovery Disc when at step seven.
Using a Windows 7 Installation DVD at step seven will also allow you to install Windows 7 via USB, not just recover a damaged system; very useful if you have a netbook!
Step two: Open a command prompt with administrative rights. To do this, click Start > All Programs > Accessories and then right click Command Prompt, followed by clicking Run as administrator.
Step three: After accepting any UAC verification questions, you should now be at the command prompt. Make sure your USB flash drive is plugged in and then type DiskPart, followed by pressing Enter.
Step four: Type List Disk and then press Enter. Determine which disk number corresponds to your USB flash drive. In the following scenario, Disk 1 corresponds to our USB drive since we know our USB drive has a capacity of 2-gigabytes.
Step five: Enter the following commands in order, changing the disk number to the disk number listed for your USB drive. Warning - the following commands will erase everything on your USB drive or the disk you select.
Select Disk 1
Clean
Create Partition Primary
Select Partition 1
Active
Format FS=NTFS
Step six: After DiskPart successfully formats the USB drive, which might take a few minutes, you will want to enter the following commands:
Assign
Exit
ZoomStep seven: You will now need to copy the contents of the ISO image you downloaded, or the contents of a DVD you wish use, to the USB flash drive. There should be two folders and a file in the ISO image that need to be copied. To extract the files contained within an ISO image, you will need to use a program such as WinRAR. You can download WinRAR from here.
Step eight: Now that the files are copied, we will want to make the USB drive bootable. To accomplish this however we will need to download a small file called bootsect.exe; it can be downloaded from here or here. The file can also be found in the boot directory of the Windows 7 Installation DVD. Once downloaded, place the bootsect.exe file in the root directory of your USB flash drive.
Step nine: Back at the command prompt, we will want to change the current directory to that of the USB drive and run the bootsect command. In our case this is drive E, so we will be using the following respective commands:
e:
bootsect /nt60 e:
The bootsect command will update the target volume with a compatible bootcode. If all goes well, you should now have a bootable USB recovery drive; just remember to add the USB drive to the boot list in your system's BIOS for it to work upon start up.
(Nguồn: http://www.tomshardware.com/news/win7-windows-7-mbr,10036.html)
Thứ Năm, 2 tháng 6, 2011

Thứ Hai, 9 tháng 5, 2011
4 cách truy cập Facebook (update ngày 12.1.2011)
Hiện vẫn còn rất nhiều bạn gặp khó khăn trong việc truy cập FB hoăc truy cập được nhưng không up được ảnh hay không dùng được các applications. HHT Online xin bổ sung thêm một cách khá hữu hiệu để khắc phục tình trạng trên:
Sử dụng 1 trong các Proxy sau đây cho trình duyệt web:
189.3.177.146 - Port :8080
218.207.217.245 - Port :80
190.144.136.242 - Port :8080
213.248.47.87 - Port :8080
190.121.138.217 - Port :80
188.138.32.165 - Port :3128
188.75.135.130 - Port :80
187.115.162.6 - Port :3128
118.97.208.186 - Port :8080
82.14.6.150 - Port :8085
200.21.15.109 - Port :3128
217.113.59.45 - Port :80
82.209.229.207 - Port :3128
80.98.164.46 - Port :3128
85.204.204.123 - Port :8080
222.124.178.98 - Port :3128
Cách điền Proxy cho trình duyệt:
Dành cho người dùng Windows:
*Firefox: Bạn vào menu Tools > Options... Chọn Advanced > Network. Bấm vào nút Settings trong phần Connection. Chọn Manual proxy configuration. Sau đó điền 1 trong các proxy trên vào HHTP proxy. Lưu ý điền đúng Port của proxy mà bạn chọn. Cuối cùng tick vào dòng Use this proxy server for all protocols và nhất nút OK để hoàn tất.
*Internet Explorer: Bạn bấm vào nút Tools góc phía trên bên phải hoặc nhấn phím tắt Alt + X, chọn Internet Options > Connections > LAN settings. Sau đó tick vào dòng Use a proxy server for your LAN (...) rồi điền thông số của proxy vào ô phía dưới. Nhấn OK để hoàn tất.
Dành cho người dùng Mac:
*Firefox: Bạn vào menu Firefox > Preferences... hoặc dùng phím tắt Command + , Chọn Advanced > Network rồi làm theo các bước giống phần Windows.
*Safari: Bạn vào menu Safari > Preferences... hoặc dùng phím tắt Command +, Chọn Advanced > Change Settings ở phần Proxies. Tick vào dòng Web proxy (HTTP) rồi điền thông số của proxy vào ô bên phải. Nhấn OK để hoàn tất.
Như vậy là bạn đã có thể vào FB bình thường mặc dù tốc độ có thể chậm hơn đôi chút, tùy thuộc vào proxy mà bạn chọn. Bạn cần lưu ý rằng các proxy này có tuổi đời không cao, thường không ổn định và có thể die bất cứ lúc nào. HHT Online sẽ thường xuyên cập nhất các proxy mới để bạn thay thế.
Ngoài ra bạn cũng có thể tham khảo 1 trong 4 cách say đây:
1. Sử dụng server dự phòng của Facebook:
Bạn truy cập địa chỉ http://www.lisp4.facebook.com để đăng nhập vào FB, nếu muốn sử dụng game hoặc các ứng dụng khác thì thêm đường dẫn http://apps.lisp4.facebook.com ở đằng trước. Ví dụ: http://apps.lisp4.facebook.com/barnbuddy
Cách này giúp bạn truy cập FB tương đối nhanh và an toàn tuy nhiên hơi phiền phức vì phải nhập đường dẫn thủ công bằng tay và không upload được ảnh.
2. Điều chỉnh lại thông tin hosts FB khi kết nối
* Dành cho teen dùng Windows:
Bạn mở file: C:\WINDOWS\system32\drivers\etc\hosts bằng Notepad
Thêm vào dòng cuối cùng đoạn link sau:
153.16.15.71 www.facebook.com
153.16.15.71 register.facebook.com
153.16.15.71 www.logins.facebook.com
153.16.15.71 facebook.com
153.16.15.71 blog.facebook.com
153.16.15.71 logins.facebook.com
153.16.15.71 login.facebook.com
153.16.15.71 apps.facebook.com
153.16.15.71 upload.facebook.com
153.16.15.71 graph.facebook.com
153.16.15.71 photos-a.ak.fbcdn.net
153.16.15.71 photos-b.ak.fbcdn.net
153.16.15.71 photos-c.ak.fbcdn.net
153.16.15.71 photos-d.ak.fbcdn.net
153.16.15.71 photos-e.ak.fbcdn.net
153.16.15.71 photos-f.ak.fbcdn.net
153.16.15.71 photos-g.ak.fbcdn.net
153.16.15.71 photos-h.ak.fbcdn.net
153.16.15.71 static.ak.connect.facebook.com
153.16.15.71 static.ak.fbcdn.net
153.16.15.71 b.static.ak.fbcdn.net
153.16.15.71 error.facebook.com
153.16.15.71 developers.facebook.com
153.16.15.71 pixel.facebook.com
153.16.15.71 api.facebook.com
153.16.15.71 chanel.facebook.com
153.16.15.71 0.50.chanel.facebook.com
153.16.15.71 external.ak.fbcdn.net
153.16.15.71 profile.ak.fbcdn.net
153.16.15.71 creative.ak.fbcdn.net
Sau đó khởi động lại trình duyệt là có thể truy cập FB. Cách này cho phép bạn upload ảnh, thay avatar như bình thường.
* Dành cho teen dùng Mac:
Bạn mở ứng dụng Terminal của Mac từ đường dẫn Applications -> Utilities -> Terminal.
Nhập vào câu lệnh sau:
sudo nano /private/etc/hosts
Mac yêu cầu bạn nhập password account của bạn để confirm quyền quản trị, nếu máy bạn ko cài password login thì bạn phải cài ở System Preferences > Accounts
Nội dung file hosts được mở ra và bạn điền vào dòng cuối đoạn link:
153.16.15.71 www.facebook.com
153.16.15.71 register.facebook.com
153.16.15.71 www.logins.facebook.com
153.16.15.71 facebook.com
153.16.15.71 blog.facebook.com
153.16.15.71 logins.facebook.com
153.16.15.71 login.facebook.com
153.16.15.71 apps.facebook.com
153.16.15.71 upload.facebook.com
153.16.15.71 graph.facebook.com
153.16.15.71 photos-a.ak.fbcdn.net
153.16.15.71 photos-b.ak.fbcdn.net
153.16.15.71 photos-c.ak.fbcdn.net
153.16.15.71 photos-d.ak.fbcdn.net
153.16.15.71 photos-e.ak.fbcdn.net
153.16.15.71 photos-f.ak.fbcdn.net
153.16.15.71 photos-g.ak.fbcdn.net
153.16.15.71 photos-h.ak.fbcdn.net
153.16.15.71 static.ak.connect.facebook.com
153.16.15.71 static.ak.fbcdn.net
153.16.15.71 b.static.ak.fbcdn.net
153.16.15.71 error.facebook.com
153.16.15.71 developers.facebook.com
153.16.15.71 pixel.facebook.com
153.16.15.71 api.facebook.com
153.16.15.71 chanel.facebook.com
153.16.15.71 0.50.chanel.facebook.com
153.16.15.71 external.ak.fbcdn.net
153.16.15.71 profile.ak.fbcdn.net
153.16.15.71 creative.ak.fbcdn.net
Nhấn tổ hợp phím Ctrl + o để lưu lại và Ctrl + x để thoát.
Sau đó nhập câu lệnh sau vào cửa sổ Terminal:
dscacheutil -flushcache
Đóng cửa sổ Terminal và khởi động lại trình duyệt web là bạn đã có thể truy cập FB như bình thường.
3. Dùng phần mềm Ultrasurf
Bạn tải file cài đặt phần mềm tại đây.
Cách này đảm bảo 100% nhưng sẽ khiến đường truyền của bạn bị chậm đi.
4. Dùng phần mềm Auto Hide Ip
Bạn có thể tải bản dùng thử tại đây.
Tương tự như Ultrasurf, bạn sẽ thấy đường truyền của mình không được nhanh như trước.
(Theo Hoahoctro)
Sử dụng 1 trong các Proxy sau đây cho trình duyệt web:
189.3.177.146 - Port :8080
218.207.217.245 - Port :80
190.144.136.242 - Port :8080
213.248.47.87 - Port :8080
190.121.138.217 - Port :80
188.138.32.165 - Port :3128
188.75.135.130 - Port :80
187.115.162.6 - Port :3128
118.97.208.186 - Port :8080
82.14.6.150 - Port :8085
200.21.15.109 - Port :3128
217.113.59.45 - Port :80
82.209.229.207 - Port :3128
80.98.164.46 - Port :3128
85.204.204.123 - Port :8080
222.124.178.98 - Port :3128
Cách điền Proxy cho trình duyệt:
Dành cho người dùng Windows:
*Firefox: Bạn vào menu Tools > Options... Chọn Advanced > Network. Bấm vào nút Settings trong phần Connection. Chọn Manual proxy configuration. Sau đó điền 1 trong các proxy trên vào HHTP proxy. Lưu ý điền đúng Port của proxy mà bạn chọn. Cuối cùng tick vào dòng Use this proxy server for all protocols và nhất nút OK để hoàn tất.
*Internet Explorer: Bạn bấm vào nút Tools góc phía trên bên phải hoặc nhấn phím tắt Alt + X, chọn Internet Options > Connections > LAN settings. Sau đó tick vào dòng Use a proxy server for your LAN (...) rồi điền thông số của proxy vào ô phía dưới. Nhấn OK để hoàn tất.
Dành cho người dùng Mac:
*Firefox: Bạn vào menu Firefox > Preferences... hoặc dùng phím tắt Command + , Chọn Advanced > Network rồi làm theo các bước giống phần Windows.
*Safari: Bạn vào menu Safari > Preferences... hoặc dùng phím tắt Command +, Chọn Advanced > Change Settings ở phần Proxies. Tick vào dòng Web proxy (HTTP) rồi điền thông số của proxy vào ô bên phải. Nhấn OK để hoàn tất.
Như vậy là bạn đã có thể vào FB bình thường mặc dù tốc độ có thể chậm hơn đôi chút, tùy thuộc vào proxy mà bạn chọn. Bạn cần lưu ý rằng các proxy này có tuổi đời không cao, thường không ổn định và có thể die bất cứ lúc nào. HHT Online sẽ thường xuyên cập nhất các proxy mới để bạn thay thế.
Ngoài ra bạn cũng có thể tham khảo 1 trong 4 cách say đây:
1. Sử dụng server dự phòng của Facebook:
Bạn truy cập địa chỉ http://www.lisp4.facebook.com để đăng nhập vào FB, nếu muốn sử dụng game hoặc các ứng dụng khác thì thêm đường dẫn http://apps.lisp4.facebook.com ở đằng trước. Ví dụ: http://apps.lisp4.facebook.com/barnbuddy
Cách này giúp bạn truy cập FB tương đối nhanh và an toàn tuy nhiên hơi phiền phức vì phải nhập đường dẫn thủ công bằng tay và không upload được ảnh.
2. Điều chỉnh lại thông tin hosts FB khi kết nối
* Dành cho teen dùng Windows:
Bạn mở file: C:\WINDOWS\system32\drivers\etc\hosts bằng Notepad
Thêm vào dòng cuối cùng đoạn link sau:
153.16.15.71 www.facebook.com
153.16.15.71 register.facebook.com
153.16.15.71 www.logins.facebook.com
153.16.15.71 facebook.com
153.16.15.71 blog.facebook.com
153.16.15.71 logins.facebook.com
153.16.15.71 login.facebook.com
153.16.15.71 apps.facebook.com
153.16.15.71 upload.facebook.com
153.16.15.71 graph.facebook.com
153.16.15.71 photos-a.ak.fbcdn.net
153.16.15.71 photos-b.ak.fbcdn.net
153.16.15.71 photos-c.ak.fbcdn.net
153.16.15.71 photos-d.ak.fbcdn.net
153.16.15.71 photos-e.ak.fbcdn.net
153.16.15.71 photos-f.ak.fbcdn.net
153.16.15.71 photos-g.ak.fbcdn.net
153.16.15.71 photos-h.ak.fbcdn.net
153.16.15.71 static.ak.connect.facebook.com
153.16.15.71 static.ak.fbcdn.net
153.16.15.71 b.static.ak.fbcdn.net
153.16.15.71 error.facebook.com
153.16.15.71 developers.facebook.com
153.16.15.71 pixel.facebook.com
153.16.15.71 api.facebook.com
153.16.15.71 chanel.facebook.com
153.16.15.71 0.50.chanel.facebook.com
153.16.15.71 external.ak.fbcdn.net
153.16.15.71 profile.ak.fbcdn.net
153.16.15.71 creative.ak.fbcdn.net
Sau đó khởi động lại trình duyệt là có thể truy cập FB. Cách này cho phép bạn upload ảnh, thay avatar như bình thường.
* Dành cho teen dùng Mac:
Bạn mở ứng dụng Terminal của Mac từ đường dẫn Applications -> Utilities -> Terminal.
Nhập vào câu lệnh sau:
sudo nano /private/etc/hosts
Mac yêu cầu bạn nhập password account của bạn để confirm quyền quản trị, nếu máy bạn ko cài password login thì bạn phải cài ở System Preferences > Accounts
Nội dung file hosts được mở ra và bạn điền vào dòng cuối đoạn link:
153.16.15.71 www.facebook.com
153.16.15.71 register.facebook.com
153.16.15.71 www.logins.facebook.com
153.16.15.71 facebook.com
153.16.15.71 blog.facebook.com
153.16.15.71 logins.facebook.com
153.16.15.71 login.facebook.com
153.16.15.71 apps.facebook.com
153.16.15.71 upload.facebook.com
153.16.15.71 graph.facebook.com
153.16.15.71 photos-a.ak.fbcdn.net
153.16.15.71 photos-b.ak.fbcdn.net
153.16.15.71 photos-c.ak.fbcdn.net
153.16.15.71 photos-d.ak.fbcdn.net
153.16.15.71 photos-e.ak.fbcdn.net
153.16.15.71 photos-f.ak.fbcdn.net
153.16.15.71 photos-g.ak.fbcdn.net
153.16.15.71 photos-h.ak.fbcdn.net
153.16.15.71 static.ak.connect.facebook.com
153.16.15.71 static.ak.fbcdn.net
153.16.15.71 b.static.ak.fbcdn.net
153.16.15.71 error.facebook.com
153.16.15.71 developers.facebook.com
153.16.15.71 pixel.facebook.com
153.16.15.71 api.facebook.com
153.16.15.71 chanel.facebook.com
153.16.15.71 0.50.chanel.facebook.com
153.16.15.71 external.ak.fbcdn.net
153.16.15.71 profile.ak.fbcdn.net
153.16.15.71 creative.ak.fbcdn.net
Nhấn tổ hợp phím Ctrl + o để lưu lại và Ctrl + x để thoát.
Sau đó nhập câu lệnh sau vào cửa sổ Terminal:
dscacheutil -flushcache
Đóng cửa sổ Terminal và khởi động lại trình duyệt web là bạn đã có thể truy cập FB như bình thường.
3. Dùng phần mềm Ultrasurf
Bạn tải file cài đặt phần mềm tại đây.
Cách này đảm bảo 100% nhưng sẽ khiến đường truyền của bạn bị chậm đi.
4. Dùng phần mềm Auto Hide Ip
Bạn có thể tải bản dùng thử tại đây.
Tương tự như Ultrasurf, bạn sẽ thấy đường truyền của mình không được nhanh như trước.
(Theo Hoahoctro)
Thứ Sáu, 29 tháng 4, 2011
Giới thiệu GSM Cydia
GSM Cydia là source Cydia lớn và uy tín nhất tại Việt Nam.
Các phần mềm, themes, gadget được update liên tục với phần giới thiệu chi tiết. GSM Cydia hỗ trợ các thiết bị chạy iOS gồm : iPod Touch, iPhone, iPad.
Cách cài đặt vui lòng xem clip bên dưới hoặc
Máy đã được Jailbreak (Có Cydia) - Chạy Cydia vào: Manager - Sources - Edit rồi gõ http://iphone.gsm.vn
Liên hệ số hỗ trợ:
Mr Thieu.Bocap
Tel: 0986.172.888.
Email: support@gsm.vn
(Nguồn:http://iphone.gsm.vn)
Các phần mềm, themes, gadget được update liên tục với phần giới thiệu chi tiết. GSM Cydia hỗ trợ các thiết bị chạy iOS gồm : iPod Touch, iPhone, iPad.
Cách cài đặt vui lòng xem clip bên dưới hoặc
Máy đã được Jailbreak (Có Cydia) - Chạy Cydia vào: Manager - Sources - Edit rồi gõ http://iphone.gsm.vn
Liên hệ số hỗ trợ:
Mr Thieu.Bocap
Tel: 0986.172.888.
Email: support@gsm.vn
(Nguồn:http://iphone.gsm.vn)
Thứ Sáu, 25 tháng 2, 2011
Tăng tốc Internet nhanh hơn 20% trong Windows
Trong các phiên bản của hệ điều hành Windows, Microsoft luôn dự trữ 20% tổng lượng băng thông của hệ thống để dùng cho những mục đích khác như Windows Update và kiểm soát máy tính của người dùng. Nhưng bạn hoàn toàn có thể loại bỏ chế độ này và sử dụng được toàn bộ băng thông để tăng tốc độ kết nối internet.
Người dùng thường không được khuyến cáo vô hiệu hóa tính năng này, tuy nhiên trong trường hợp kết nối internet của bạn quá chậm và không dùng đến dịch vụ Windows Update thì bạn có thể làm điều này để giải phóng băng thông một cách dễ dàng theo hướng dẫn sau (áp dụng được cho tất cả phiên bản Windows):
Bạn kích vào Start >> chọn Run và nhập “gpedit.msc” (không có dấu “) để mở cửa sổ Local group policy editor.
Ở phần bên trái của cửa sổ, tại Local Computer Policy bạn chọn Computer Configuration >> chọn Administrative Templates >> Network >> QOS Packet Scheduler. Sau đó tại phần bên phải bạn kích đúp chuột vào Limit Reservable Bandwidth.

Mặc định chế độ này được đặt not configured nhưng thực tế Windows vẫn giữ lại 20% tổng lượng băng thông, bạn có thể chỉnh sửa lại thiết lập này bằng cách chọn Enable, tại mục Options >> Bandwidth limit (%) bạn để là 0.

Bằng cách này hệ thống của bạn sẽ được sử dụng 100% băng thông để kết nối internet. Bạn hãy khởi động lại máy để cảm nhận sự khác biệt.
Đ.Hải (Theo QuanTriMang/Tipsotricks)
Người dùng thường không được khuyến cáo vô hiệu hóa tính năng này, tuy nhiên trong trường hợp kết nối internet của bạn quá chậm và không dùng đến dịch vụ Windows Update thì bạn có thể làm điều này để giải phóng băng thông một cách dễ dàng theo hướng dẫn sau (áp dụng được cho tất cả phiên bản Windows):
Bạn kích vào Start >> chọn Run và nhập “gpedit.msc” (không có dấu “) để mở cửa sổ Local group policy editor.
Ở phần bên trái của cửa sổ, tại Local Computer Policy bạn chọn Computer Configuration >> chọn Administrative Templates >> Network >> QOS Packet Scheduler. Sau đó tại phần bên phải bạn kích đúp chuột vào Limit Reservable Bandwidth.

Mặc định chế độ này được đặt not configured nhưng thực tế Windows vẫn giữ lại 20% tổng lượng băng thông, bạn có thể chỉnh sửa lại thiết lập này bằng cách chọn Enable, tại mục Options >> Bandwidth limit (%) bạn để là 0.

Bằng cách này hệ thống của bạn sẽ được sử dụng 100% băng thông để kết nối internet. Bạn hãy khởi động lại máy để cảm nhận sự khác biệt.
Đ.Hải (Theo QuanTriMang/Tipsotricks)
Thứ Tư, 9 tháng 2, 2011
Chỉ dẫn vào facebook ( for VNPT)
Hướng dẫn vào Facebook (updated 30/12)
Xin chào cộng đồng Facebook,
Đùng một cái sáng nay VNPT lại chặn Facebook của chúng ta một lần nữa (quà mừng năm mới chăng ?) Dù sao đi nữa anh em mạng xã hội chúng ta vẫn không bị cản bước…nhất là khi lối vào ngôi nhà thân yêu của chúng ta bị chặn đường…trên mạng đã lan truyền nhau rất nhiều cách để vào Facebook
Sau đây 4GIAY.NET cũng xin trình bày lại 5 bước đơn giản mà hiệu quả nhất để giúp cho bạn có thể truy cập vào Facebook
Bước 1: Như xưa : Đổi DNS của Google
(Áp dụng cho ai chưa từng đổi).
Lưu ý: Đối với những bạn đã từng đổi qua DNS Google nhưng ngày hôm nay vẫn không vào được thì hãy bỏ qua bước này & kiên nhẫn làm thêm từ bước thứ 2 nhé
Vào Control Panel\Network and Internet\Network Connections.
Sau đó click phải vào biểu tượng Network mà bạn đang sử dụng (Local Area Connection hoặc Wireless Network Connection). Chọn Properties.
Trong bảng trên thẻ Networking bạn chọn Internet Protocol Version 4
Double click vào và chọn use the following DNS server addressess:
Gõ DNS của Google :
8. 8. 8. 8
8. 8. 4. 4
Hoặc DNS của fb
208.67.222.222
208.67.220.220
Chọn ok. Như vậy là bạn đã xong bước 1
Bước 2 : Đổi host.
Vào ổ mà bạn đã cài Win (thông thường là ổ C:\)
Vào windows\system32\drivers\etc
Click phải hosts, nhấn open. (Trường hợp cẩn thận thì bạn nên copy file hosts này ra desktop để lỡ có lỗi thì làm lại)
Bước 3: mở file hosts bằng notepad.
Bước 4 : Chỉnh sửa file hosts bằng Notepad.
Thêm vào cuối đoạn notepad 2 dòng sau (đừng quan tâm đến những dòng khác):
125.252.224.88 http://www.facebook.com
69.63.181.12 apps.facebook.com
Sau đó bấm save lại như save văn bản bình thường.
Nếu vẫn không đạt hiệu quả thì bạn lặp lại bước 4 & thay 2 dòng trên bằng đoạn sau:
Trích:
153.16.15.71 facebook.com
153.16.15.71 http://www.facebook.com
153.16.15.71 apps.facebook.com
153.16.15.71 login.facebook.com
153.16.15.71 graph.facebook.com
153.16.15.71 static.ak.connect.facebook.com
153.16.15.71 developers.facebook.com
153.16.15.71 error.facebook.com
HOẶC DÒNG DƯỚI
Trích:
125.252.224.88 http://www.facebook.com
69.63.181.12 apps.facebook.com
153.16.15.71 login.facebook.com
153.16.15.71 graph.facebook.com
153.16.15.71 static.ak.connect.facebook.com
153.16.15.71 developers.facebook.com
153.16.15.71 error.facebook.com
Ỡ ĐÂY THEO MÌNH SỬ DỤNG NHƯ SAU
DNS FACE BOOK VÀ FILE HOST THÊM DÒNG THỨ 2 SỬ DỤNG HIỆU QUẢ VỚI MẠNG VNPT
Trích:
208.67.222.222
208.67.220.220
Trích:
125.252.224.88 http://www.facebook.com
69.63.181.12 apps.facebook.com
153.16.15.71 login.facebook.com
153.16.15.71 graph.facebook.com
153.16.15.71 static.ak.connect.facebook.com
153.16.15.71 developers.facebook.com
153.16.15.71 error.facebook.com
Bước 5: Truy cập trang web :
Lưu ý là bạn phải gõ địa chỉ trang Facebook đầy đủ như thế này nhé:
http://www.facebook.com/ .
NẾU VÀO KHÔNG ĐƯỢC NHỚ KHỞI ĐỘNG LẠI MÁY ĐỂ CÓ HIỆU QUẢ
(nếu chỉ gõ facebook.com thôi thì trình duyệt của bạn cũng tìm không ra đâu)
——
Theo một số bạn , rằng những cách trên đều không hiệu quả, như vậy 4GIAY.NET xin trình bày một cách nữa để bạn có thể vào Facebook đó là dùng các link sau:
http://www.lisp4.facebook.com/ (Trang Chủ Facebook)
http://apps.lisp4.facebook.com/ (Apps Facebook)
Như vậy là xong. Bạn đã hoàn toàn có thể truy cập vào Facebook-ngôi nhà thân yêu của bạn để chat chit với bạn bè.
Trích:
Dùng trình chuyên biệt:
Ultrasurf – http://www.ultrareach.com
Hotspot Shield – http://hotspotshield.com/
HAVE FUN!
CHÚC MỌI NGƯỜI THÀNH CÔNG
HÃY SHARE VÀ CHIA SẺ NẾU THẤY CÓ ÍCH
http://4giay.net/showthread.php?t=105126
Xin chào cộng đồng Facebook,
Đùng một cái sáng nay VNPT lại chặn Facebook của chúng ta một lần nữa (quà mừng năm mới chăng ?) Dù sao đi nữa anh em mạng xã hội chúng ta vẫn không bị cản bước…nhất là khi lối vào ngôi nhà thân yêu của chúng ta bị chặn đường…trên mạng đã lan truyền nhau rất nhiều cách để vào Facebook
Sau đây 4GIAY.NET cũng xin trình bày lại 5 bước đơn giản mà hiệu quả nhất để giúp cho bạn có thể truy cập vào Facebook
Bước 1: Như xưa : Đổi DNS của Google
(Áp dụng cho ai chưa từng đổi).
Lưu ý: Đối với những bạn đã từng đổi qua DNS Google nhưng ngày hôm nay vẫn không vào được thì hãy bỏ qua bước này & kiên nhẫn làm thêm từ bước thứ 2 nhé
Vào Control Panel\Network and Internet\Network Connections.
Sau đó click phải vào biểu tượng Network mà bạn đang sử dụng (Local Area Connection hoặc Wireless Network Connection). Chọn Properties.
Trong bảng trên thẻ Networking bạn chọn Internet Protocol Version 4
Double click vào và chọn use the following DNS server addressess:
Gõ DNS của Google :
8. 8. 8. 8
8. 8. 4. 4
Hoặc DNS của fb
208.67.222.222
208.67.220.220
Chọn ok. Như vậy là bạn đã xong bước 1
Bước 2 : Đổi host.
Vào ổ mà bạn đã cài Win (thông thường là ổ C:\)
Vào windows\system32\drivers\etc
Click phải hosts, nhấn open. (Trường hợp cẩn thận thì bạn nên copy file hosts này ra desktop để lỡ có lỗi thì làm lại)
Bước 3: mở file hosts bằng notepad.
Bước 4 : Chỉnh sửa file hosts bằng Notepad.
Thêm vào cuối đoạn notepad 2 dòng sau (đừng quan tâm đến những dòng khác):
125.252.224.88 http://www.facebook.com
69.63.181.12 apps.facebook.com
Sau đó bấm save lại như save văn bản bình thường.
Nếu vẫn không đạt hiệu quả thì bạn lặp lại bước 4 & thay 2 dòng trên bằng đoạn sau:
Trích:
153.16.15.71 facebook.com
153.16.15.71 http://www.facebook.com
153.16.15.71 apps.facebook.com
153.16.15.71 login.facebook.com
153.16.15.71 graph.facebook.com
153.16.15.71 static.ak.connect.facebook.com
153.16.15.71 developers.facebook.com
153.16.15.71 error.facebook.com
HOẶC DÒNG DƯỚI
Trích:
125.252.224.88 http://www.facebook.com
69.63.181.12 apps.facebook.com
153.16.15.71 login.facebook.com
153.16.15.71 graph.facebook.com
153.16.15.71 static.ak.connect.facebook.com
153.16.15.71 developers.facebook.com
153.16.15.71 error.facebook.com
Ỡ ĐÂY THEO MÌNH SỬ DỤNG NHƯ SAU
DNS FACE BOOK VÀ FILE HOST THÊM DÒNG THỨ 2 SỬ DỤNG HIỆU QUẢ VỚI MẠNG VNPT
Trích:
208.67.222.222
208.67.220.220
Trích:
125.252.224.88 http://www.facebook.com
69.63.181.12 apps.facebook.com
153.16.15.71 login.facebook.com
153.16.15.71 graph.facebook.com
153.16.15.71 static.ak.connect.facebook.com
153.16.15.71 developers.facebook.com
153.16.15.71 error.facebook.com
Bước 5: Truy cập trang web :
Lưu ý là bạn phải gõ địa chỉ trang Facebook đầy đủ như thế này nhé:
http://www.facebook.com/ .
NẾU VÀO KHÔNG ĐƯỢC NHỚ KHỞI ĐỘNG LẠI MÁY ĐỂ CÓ HIỆU QUẢ
(nếu chỉ gõ facebook.com thôi thì trình duyệt của bạn cũng tìm không ra đâu)
——
Theo một số bạn , rằng những cách trên đều không hiệu quả, như vậy 4GIAY.NET xin trình bày một cách nữa để bạn có thể vào Facebook đó là dùng các link sau:
http://www.lisp4.facebook.com/ (Trang Chủ Facebook)
http://apps.lisp4.facebook.com/ (Apps Facebook)
Như vậy là xong. Bạn đã hoàn toàn có thể truy cập vào Facebook-ngôi nhà thân yêu của bạn để chat chit với bạn bè.
Trích:
Dùng trình chuyên biệt:
Ultrasurf – http://www.ultrareach.com
Hotspot Shield – http://hotspotshield.com/
HAVE FUN!
CHÚC MỌI NGƯỜI THÀNH CÔNG
HÃY SHARE VÀ CHIA SẺ NẾU THẤY CÓ ÍCH
http://4giay.net/showthread.php?t=105126
Chủ Nhật, 9 tháng 1, 2011
Chia sẻ kết nối 3G (Setup Router 3G Edimax 6210 with Battery)
1.Phương thức thực hiện
Có nhiều cách chia sẻ sóng 3G. Trước hết, anh có thể dùng chiếc laptop, netbook tích hợp khe gắn sim 3G hoặc có USB 3G. Ngoài ra thì smartphone hỗ trợ 3G cũng làm tốt vai trò này. Hoặc chọn 1 bộ phát sóng có tích hợp cả cổng Lan lẫn USB 3G để phát sóng 3G.
Trường hợp, dùng smartphone 3G làm trạm phát sóng 3G thì công việc đầu tiên là cài phần mềm WMWifirouter. Download tại www.wmwifirouter.com, bản mới nhất 2,4 ra mắt hồi tháng 4/2010. Đây là bản có thu phí, giá 15Euro và cho dùng thử 21 ngày, phù hợp với Windows Mobile 5 và 6. Nếu không dùng Windows Mobile thì có thể dùng Joicuspot hỗ trợ Symbian S60. Tương tự, nếu anh muốn dùng laptop, netbook làm trạm phát sóng thì cũng dùng phần mềm, điển hình như Connectify. Tuy nhiên, những giải pháp trên chỉ mang tính tạm thời. Đặc biệt, trong trường hợp dùng smartphone làm trạm phát sóng thì chi phí khá cao.
2.Dùng thiết bị chuyên dụng
Với quy mô doanh nghiệp thì giải pháp anh nên hướng đến là dùng thiết bị chuyên dụng. Thị trường hiện có nhiều Router 3G của các hãng: Edimax, Tenda, Huawei... giá dao động từ 900.000 đồng đến hơn 3 triệu đồng... Đa số đều có cổng USB để gắn USB 3G và cổng Lan để cắm mạng. Những mẫu lớn có đến 4 cổng Lan. Một số mẫu mini bỏ túi thì ít cổng hơn nhưng rất tiện khi đi xa. Khi đường truyền trục trặc thì dùng Router 3G để phát sóng 3G cho cả phòng. Song, nhiều Router hiện nay gặp trở ngại là nếu mất điện thì thiết bị này cũng “tịt” luôn.
Vì vậy, anh nên chú ý đến Router 3G có pin dự phòng. Ví như Router 3G Edimax 6210 mới và ra mắt tích hợp pin bên trong nên khi mất điện, thiết bị vẫn có thể hoạt động liên tục trong 2,5 giờ. Theo thử nghiệm của chúng tôi, cài đặt thiết bị khá đơn giản. Đầu tiên, nối cable Lan từ máy tính đến thiết bị. Sau đó gõ vào trình duyệt Internet dòng địa chỉ được ghi ở phía mặt sau thiết bị (192.168.2.1). Khi truy cập, trình duyệt Internet sẽ hỏi mật khẩu Password và Username. Những thông tin này đều được ghi ở mặt sau thiết bị. Sau đó, vào giao diện chính, có khá nhiều Setting nhưng chỉ cần chú ý 2 bước cơ bản nhất: Setting thiết bị 3G: Vào mục Wan/3G-3,5G. Cài đặt các thông số APN, Username, Password, AT dial là *99#. Tùy theo từng thông số của các nhà mạng như Vinaphone có APN là Internet, Password và Username để trống. Còn Mobifone có APN là m-wap, Password và Usernam là mms. Chọn Apply/Continue để tiếp tục thực hiện bước sau.
Xong bước này là đã có thể kết nối latop, netbook với thiết bị qua sóng 3G. Tuy nhiên, ta cần thêm bước bảo mật để tránh bị nhiều người xâm nhập. Vào mục Wireless/ Security setting chọn một kiểu bảo mật cùng password. VD như: Ở mục Encryptions chọn WPA pre-shared key, chọn WPA (TKIP), mục Pre-shared key format chọn Passphrase. Nhập password vào mục Pre-shared key. Chọn Apply/Aplly và chờ đợi thiết bị restart trong khoảng 50 giây. Sau cùng, rút dây nối giữa Router và máy tính. Cắm USB 3G vào Router. Bây giờ, anh có thể kết nối vào Internet thông qua 3G với thiết bị Router 3G 6210. Trong diện tích phòng trong khoảng 20 m trở lại, hay những nhóm người ngồi gần nhau dều có thể chia sẻ sóng 3G cho nhau. Theo đánh giá của chúng tôi, khi kết nối USB 3G Vinaphone vào Edimax 3G 6210 thì tốc độ truy cập nhanh, mượt. Cả 3 máy HP, Acer và máy tính bảng Pipad truy cập cùng lúc vẫn rất ngọt ngào.
3.Một vài lưu ý cần thiết:
Router 3G nhỏ gọn thích hợp khi di chuyển nhiều. Trường hợp ít di chuyển và cần sóng phát ra mạnh thi nên chọn loại Router lớn hơn, có anten đi kèm.
Khi chọn, cũng cần lưu ý đến các thông số như Router có hỗ trợ 2,5G hay không? Vì nó rất cần thiết trong các trường hợp sóng 3G tại khu vực nào đó không mạnh. Lúc đó, Router sẽ tự động chuyển qua 2,5G để bạn liên tục giữ kết nối.
Vy Ái Dân (xahoithongtin.com.vn)
Có nhiều cách chia sẻ sóng 3G. Trước hết, anh có thể dùng chiếc laptop, netbook tích hợp khe gắn sim 3G hoặc có USB 3G. Ngoài ra thì smartphone hỗ trợ 3G cũng làm tốt vai trò này. Hoặc chọn 1 bộ phát sóng có tích hợp cả cổng Lan lẫn USB 3G để phát sóng 3G.
Trường hợp, dùng smartphone 3G làm trạm phát sóng 3G thì công việc đầu tiên là cài phần mềm WMWifirouter. Download tại www.wmwifirouter.com, bản mới nhất 2,4 ra mắt hồi tháng 4/2010. Đây là bản có thu phí, giá 15Euro và cho dùng thử 21 ngày, phù hợp với Windows Mobile 5 và 6. Nếu không dùng Windows Mobile thì có thể dùng Joicuspot hỗ trợ Symbian S60. Tương tự, nếu anh muốn dùng laptop, netbook làm trạm phát sóng thì cũng dùng phần mềm, điển hình như Connectify. Tuy nhiên, những giải pháp trên chỉ mang tính tạm thời. Đặc biệt, trong trường hợp dùng smartphone làm trạm phát sóng thì chi phí khá cao.
2.Dùng thiết bị chuyên dụng
Với quy mô doanh nghiệp thì giải pháp anh nên hướng đến là dùng thiết bị chuyên dụng. Thị trường hiện có nhiều Router 3G của các hãng: Edimax, Tenda, Huawei... giá dao động từ 900.000 đồng đến hơn 3 triệu đồng... Đa số đều có cổng USB để gắn USB 3G và cổng Lan để cắm mạng. Những mẫu lớn có đến 4 cổng Lan. Một số mẫu mini bỏ túi thì ít cổng hơn nhưng rất tiện khi đi xa. Khi đường truyền trục trặc thì dùng Router 3G để phát sóng 3G cho cả phòng. Song, nhiều Router hiện nay gặp trở ngại là nếu mất điện thì thiết bị này cũng “tịt” luôn.
Vì vậy, anh nên chú ý đến Router 3G có pin dự phòng. Ví như Router 3G Edimax 6210 mới và ra mắt tích hợp pin bên trong nên khi mất điện, thiết bị vẫn có thể hoạt động liên tục trong 2,5 giờ. Theo thử nghiệm của chúng tôi, cài đặt thiết bị khá đơn giản. Đầu tiên, nối cable Lan từ máy tính đến thiết bị. Sau đó gõ vào trình duyệt Internet dòng địa chỉ được ghi ở phía mặt sau thiết bị (192.168.2.1). Khi truy cập, trình duyệt Internet sẽ hỏi mật khẩu Password và Username. Những thông tin này đều được ghi ở mặt sau thiết bị. Sau đó, vào giao diện chính, có khá nhiều Setting nhưng chỉ cần chú ý 2 bước cơ bản nhất: Setting thiết bị 3G: Vào mục Wan/3G-3,5G. Cài đặt các thông số APN, Username, Password, AT dial là *99#. Tùy theo từng thông số của các nhà mạng như Vinaphone có APN là Internet, Password và Username để trống. Còn Mobifone có APN là m-wap, Password và Usernam là mms. Chọn Apply/Continue để tiếp tục thực hiện bước sau.
Xong bước này là đã có thể kết nối latop, netbook với thiết bị qua sóng 3G. Tuy nhiên, ta cần thêm bước bảo mật để tránh bị nhiều người xâm nhập. Vào mục Wireless/ Security setting chọn một kiểu bảo mật cùng password. VD như: Ở mục Encryptions chọn WPA pre-shared key, chọn WPA (TKIP), mục Pre-shared key format chọn Passphrase. Nhập password vào mục Pre-shared key. Chọn Apply/Aplly và chờ đợi thiết bị restart trong khoảng 50 giây. Sau cùng, rút dây nối giữa Router và máy tính. Cắm USB 3G vào Router. Bây giờ, anh có thể kết nối vào Internet thông qua 3G với thiết bị Router 3G 6210. Trong diện tích phòng trong khoảng 20 m trở lại, hay những nhóm người ngồi gần nhau dều có thể chia sẻ sóng 3G cho nhau. Theo đánh giá của chúng tôi, khi kết nối USB 3G Vinaphone vào Edimax 3G 6210 thì tốc độ truy cập nhanh, mượt. Cả 3 máy HP, Acer và máy tính bảng Pipad truy cập cùng lúc vẫn rất ngọt ngào.
3.Một vài lưu ý cần thiết:
Router 3G nhỏ gọn thích hợp khi di chuyển nhiều. Trường hợp ít di chuyển và cần sóng phát ra mạnh thi nên chọn loại Router lớn hơn, có anten đi kèm.
Khi chọn, cũng cần lưu ý đến các thông số như Router có hỗ trợ 2,5G hay không? Vì nó rất cần thiết trong các trường hợp sóng 3G tại khu vực nào đó không mạnh. Lúc đó, Router sẽ tự động chuyển qua 2,5G để bạn liên tục giữ kết nối.
Vy Ái Dân (xahoithongtin.com.vn)
Chia sẻ kết nối không dây 3G trong Windows 7
Nếu bạn cần truy cập Internet cho nhiều máy tính nhưng lại chỉ có một điểm truy cập Internet, trong trường hợp này bạn sẽ làm gì? Giải pháp được chúng tôi giới thiệu trong bài là tạo một WIFI hotspot để bạn có thể chia sẻ kết nối Internet giữa các máy tính với nhau. Trước đây chúng tôi đã giới thiệu cho các bạn bài Sử dụng Mac OS X tạo Wifi Hotspot. Trong bài này, chúng tôi sẽ giới thiệu cho các bạn cách chia sẻ kết nối 3G của bạn trong Windows 7.
1. Kết nối đến mạng 3G
2. Vào Network and Sharing Center (Control Panel -> Network and Internet -> Network and Sharing Center)
3. Kích vào kết nối 3G. Trong bài, tên mạng ở đây là Singtel.

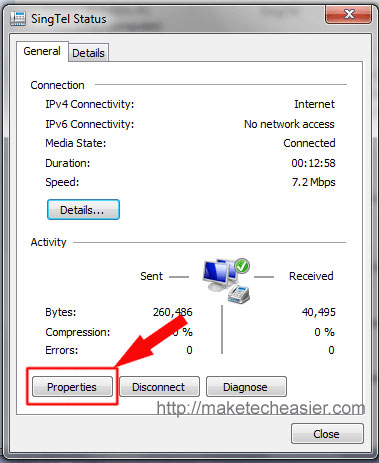
4. Kích Properties.

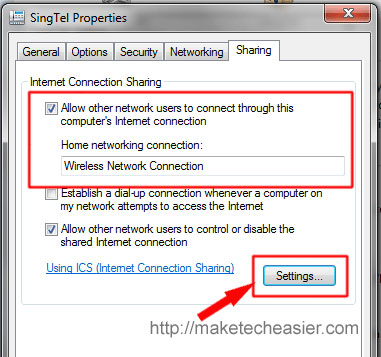
5. Vào tab Sharing. Tích vào hộp kiểm “Allow others network users to connect through this computer’s Internet connection”. Trong dánh sách sổ xuống, chọn “Wireless Network Connection“. Sau đó kích nút Settings.

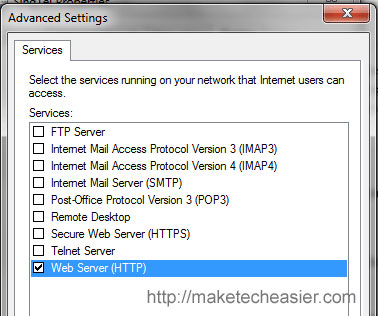
6. Tích vào hộp kiểm “Web Server (HTTP)”. Đây là hộp kiểm cho phép máy tính khác có thể truy cập Internet thông qua kết nối.

Kích OK để trở về Network and Sharing center.
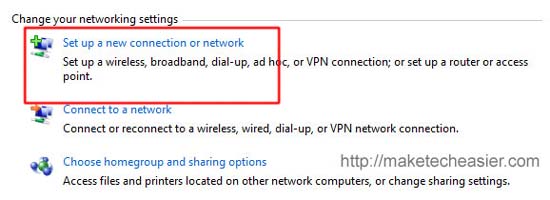
7. Tiếp đến, kích “Set up a new connection or network”

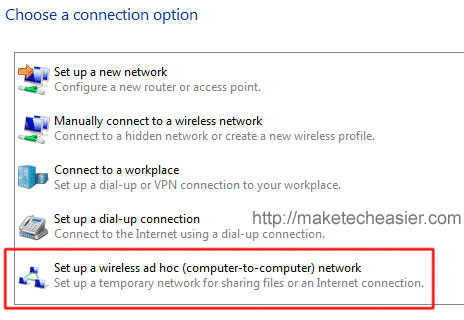
8. Tìm đến tùy chọn “Set up a wireless ad hoc network” và chọn nó.

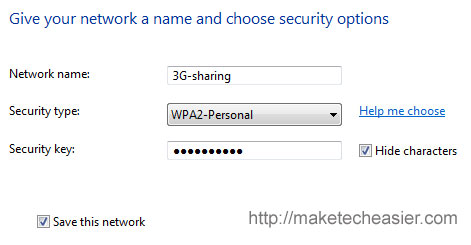
9. Đặt tên và mật khẩu cho mạng. Kích Next.

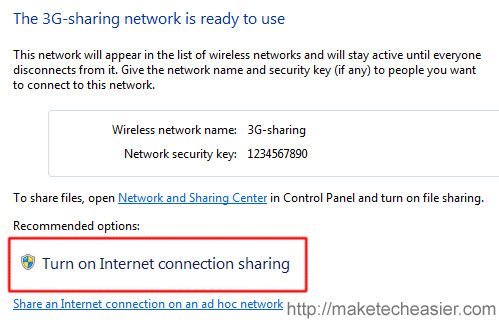
10. Trong màn hình tiếp theo, kích “Turn on Internet Connection sharing”.

Lúc này bạn có thể kết nối đến máy tính này và truy cập Internet từ các máy tính khác.
Liệu có phương pháp nào dễ dàng hơn?
Nếu bạn thấy phương pháp ở trên quá phức tạp đối với mình thì bạn có thể sử dụng tiện ích Connectify để thực hiện điều đó.
Connectify là một phần mềm miễn phí cho phép bạn tạo một WIFI hotspot dễ dàng. Nó rất dễ sử dụng và chỉ cần đến một cấu hình tối thiểu.
1. Download và cài đặt Connectify.
2. Chạy Connectify.
3. Kích biểu tượng Connectify tại khay hệ thống.

4. Đặt tên và mật khẩu cho mạng. Bên dưới hộp chọn Internet sổ xuống, chọn kết nối 3G (nó làm việc với kết nối không dây và kết nối LAN)
Khi thực hiện xong, kích nút Start Hotspot. Lúc này bạn sẽ có thể kết nối đến máy tính này và truy cập Internet.
Văn Linh (Theo Maketecheasier)
1. Kết nối đến mạng 3G
2. Vào Network and Sharing Center (Control Panel -> Network and Internet -> Network and Sharing Center)
3. Kích vào kết nối 3G. Trong bài, tên mạng ở đây là Singtel.
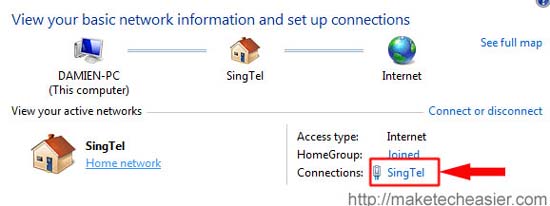
4. Kích Properties.
5. Vào tab Sharing. Tích vào hộp kiểm “Allow others network users to connect through this computer’s Internet connection”. Trong dánh sách sổ xuống, chọn “Wireless Network Connection“. Sau đó kích nút Settings.
6. Tích vào hộp kiểm “Web Server (HTTP)”. Đây là hộp kiểm cho phép máy tính khác có thể truy cập Internet thông qua kết nối.
Kích OK để trở về Network and Sharing center.
7. Tiếp đến, kích “Set up a new connection or network”
8. Tìm đến tùy chọn “Set up a wireless ad hoc network” và chọn nó.
9. Đặt tên và mật khẩu cho mạng. Kích Next.
10. Trong màn hình tiếp theo, kích “Turn on Internet Connection sharing”.
Lúc này bạn có thể kết nối đến máy tính này và truy cập Internet từ các máy tính khác.
Liệu có phương pháp nào dễ dàng hơn?
Nếu bạn thấy phương pháp ở trên quá phức tạp đối với mình thì bạn có thể sử dụng tiện ích Connectify để thực hiện điều đó.
Connectify là một phần mềm miễn phí cho phép bạn tạo một WIFI hotspot dễ dàng. Nó rất dễ sử dụng và chỉ cần đến một cấu hình tối thiểu.
1. Download và cài đặt Connectify.
2. Chạy Connectify.
3. Kích biểu tượng Connectify tại khay hệ thống.
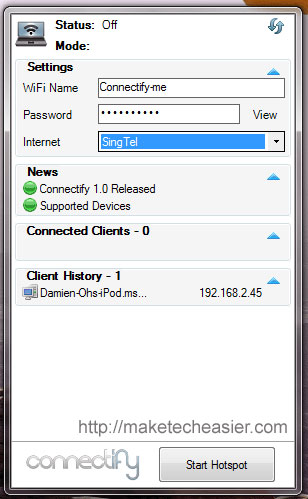
4. Đặt tên và mật khẩu cho mạng. Bên dưới hộp chọn Internet sổ xuống, chọn kết nối 3G (nó làm việc với kết nối không dây và kết nối LAN)
Khi thực hiện xong, kích nút Start Hotspot. Lúc này bạn sẽ có thể kết nối đến máy tính này và truy cập Internet.
Văn Linh (Theo Maketecheasier)
Đăng ký:
Bài đăng (Atom)
