Thứ Hai, 5 tháng 10, 2015

How to Enable or Disable to Backup Data Files in Windows 7


information   Information
This will allow you to enable or disable the ability of all users on the computer to Backup User and System Data Files in Windows 7. This is enabled by default in Windows 7.

EXAMPLE: When Backup is Disabled Messages
Name:  Message1.jpg
Views: 8095
Size:  136.7 KBName:  Message2.jpg
Views: 6878
Size:  35.8 KB 


 OPTION ONE 
Using a REG File Download
1. To Enable Backup Data Files
A) Click on the Download button below to download the file below.
Enable_Backup_Data_Files.zip
download
B) Go to step 3.
2. To Disable Backup Data Files
A) Click on the Download button below to download the file below.
Disable_Backup_Data_Files.zip
download
3. Click on Save, and save the .zip file to the desktop.

4. Open the .zip file and extract the .reg file to the desktop.

5. Right click on the .reg file and click on Merge.

6. Click on RunYesYes, and OK when prompted.

7. When done, you can delete the downloaded .reg and .zip files if you like.


 OPTION TWO 
Through the Local Group Policy Editor
1. Open the all usersspecific users or groups, or all users except administrators Local Group Policy Editor for how you want this policy applied.

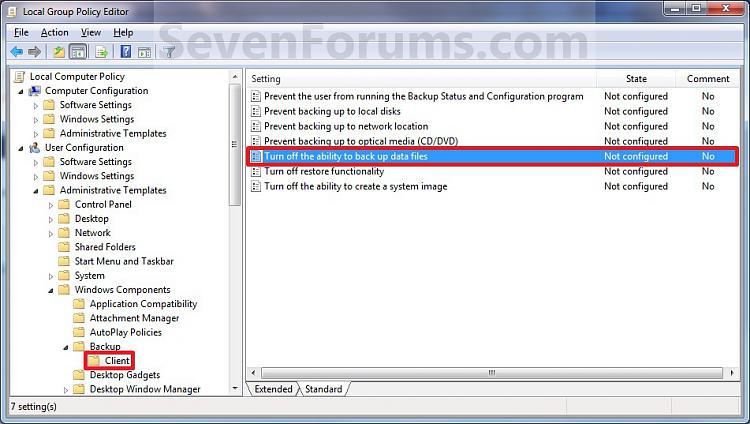
2. In the left pane, click on to expand User ConfigurationAdministrative TemplatesWindows ComponentsBackup, and Client. (See screenshot below)
-group_policy.jpg 
3. In the right pane, right click on Turn off the ability to back up data files and click on Edit. (See screenshot above)
4. To Enable Backup Data Files
A) Select (dot) either Not Configured or Disabled. (See screenshot below step 6)

B) Go to step 6.
5. To Disable Backup Data Files
A) Select (dot) Enabled. (See screenshot below step 6)
6. Click on OK. (See screenshot below)
Name:  Properties.jpg
Views: 7423
Size:  118.3 KB
7. Close the Local Group Policy Editor window.
That's it,
Shawn
Source: http://www.sevenforums.com/tutorials/628-backup-user-system-files-delete-backups.html

Thứ Sáu, 2 tháng 10, 2015

Ẩn tên User khi máy tính bị khóa trong Windows Vista/2008

Quản Trị Mạng - Bạn tự hỏi làm thế nào để ẩn đi tên của người dùng khi phiên làm việc đã bị log out ra khỏi Windows? Thực tế việc ẩn đi tên người dùng cũng cần thiết trong một môi trường làm việc cần sự bảo mật, khi đó máy tính được bảo vệ tốt hơn bởi bây giờ ngoài việc “mò” được mật khẩu vào máy, kẻ xấu còn phải tìm ra tên tài khoản user phù hợp nữa.

Bài viết này sẽ hướng dẫn bạn loại bỏ việc hiển thị tên User trên màn hình ngoài của Windows Vista và 2008.

Lưu ý: Tài liệu này sẽ hướng dẫn bạn chỉnh sửa registry của Windows. Do đó nếu có bất kỳ vấn đề gì trong việc chỉnh sửa registry đều khiến Windows của bạn có thể gặp lỗi. Hãy đảm bảo là bạn đã backup lại registry trước khi thực hiện những thay đổi theo hướng dẫn trong bài.

1. Vào trình chỉnh sửa Registry của máy tính bằng cách vào Start và nhập regedit vào ô tìm kiếm

2. Tìm đến khóa sau:
HKEY_LOCAL_MACHINE\Software\Microsoft\Windows\
CurrentVersion\Policies\System
3. Tìm đến khóa DontDisplayLockedUserId, nếu chưa có khóa này bạn vào menu Edit chọn New > DWORD Value và sau đó nhập vào giá trị registry sau:

Name: DontDisplayLockedUserId
Data: 1, 2 hoặc 3
Base: Decimal
Trong đó:
  • 1: Hiển thị tên và ID người dùng đã được khóa
  • 2: Chỉ hiện thị tên người dùng đã khóa
  • 3: Không hiển thị thông tin người dùng đã khóa
4. Thoát khỏi trình chỉnh sửa Registry

Lưu ý: Để ngăn chặn việc hiển thị người dùng cuối cùng truy cập vào máy trên màn hình logon Windows, bạn có thể đổi giá trị dontdisplaylastusername thành 1.

Đây là thay đổi sau khi chỉnh sửa trên Windows Server 2008

Trước khi chỉnh sửa:
Và sau đó:
TH - HT (Theo Petri)